Thanks to all for your responses to my last blogpost. All of them are a good read.
I had always thought a TG segment was crystal clear… WRONG. Per the classic refrain from the Legal Genealogist, Judy Russell: “It depends!” My second ever blogpost on 9 May 2015 (Benefits of Triangulation) stated 16 benefits, including: Organizing most Matches into TGs; All Matches in a TG have the same Common Ancestor; the TGs define crossovers and a Chromosome Map; TGs are equivalent to Phased data. What I didn’t say explicitly is that each TG represents a segment of my DNA.
The elephant in the room is: who was the first Ancestor to pass down that segment (as part of a full chromosome passed to a child who is my Ancestor)? In other words, in what earliest generation did that full segment first exist in my line? There may be a different such “elephant” for each Match… but that’s another story.
So back to “it depends”…. For me there are 3 objectives:
1. “See” my DNA segments. Divide up my chromosomes into discrete segments, each one of which came from a specific Ancestor.
2. Determine the Ancestor for each segment.
3. Determine my Chromosome Map of segments – each segment being adjacent to another segment from the beginning to the end of each of my 45 chromosomes.
When I started forming Triangulated Groups, I only worked with known cousin Matches. It created a patchwork of TGs. One day I decided to bite the bullet and Triangulate all of my segments, a company at a time (FTDNA, 23andMe and MyHeritage). It took months without many of the tools we have today. And the three versions meshed virtually exactly! That was as expected since all comparisons were against my DNA. I was using the “full” version of a TG, plus some judgment for large segments from close relatives that spanned more than one TG. This brings me to a significant factor in Triangulation: Judgment.
Judgment: It’s easy to compare yourself to another Match and “see” an exact shared DNA segment. But what would happen if Match 3 in the last blogpost only overlapped Match 1 by 5cM? Would we then call this a 5cM TG (against the rules and throw the whole thing out?). Would we discard Match 3 (even if they had a robust Tree that included a CA)?
Judgment: Sometimes there is a close relative, Match 5, who overlaps much more than me and Matches 2 and 4. Experience (and judgment) tells me that this somewhat larger segment is probably from a close relative whose Common Ancestor with me includes a father/mother more distant – with one of them being the CA for the full TG.
As I read over the comments of the previous blogpost, several words pop into my mind: context, messy, complex, judgment, imprecise, etc., as well as “we’re making this up as we go”.
Messy – yes Triangulating all of our Match segments against our own can be messy – and judgment is needed. Given the random nature of recombination, I do see some curve balls from time to time. Triangulation usually identifies false (IBS) segments, which should be discarded. If I find a shared segment that really messes things up, I’ll also discard it (or at least highlight it as weird). As I’ve blogged before, the raw data is sometimes messy – or fuzzy – sometimes reporting a shared DNA segment that runs longer that it should. Although my parents are not related (per GedMatch), I do have one area of my DNA that my two parents combined have all of the most common SNPs, and so I get a “zigzag” pileup of many Matches with false segments there. I’ve identified this area and then toss out those Match segments (<10cM). Pedigree collapse and endogamy also create messy areas. To the extent possible, identify these specific locations with a dummy segment to highlight the potential issue.
Context – in developing my Chromosome Map, the segments will be adjacent to each other. I look for the previous and the following TGs to the one I am working on. Ideally (and actually) each of my segments will “crossover” to the next segment which is from a different Ancestor of mine. Note – that “next” Ancestor may involve a different grandparent, or a different 3xG grandparent. We have to fill out the Chromosome map to figure that out, but it is important to remember that the next TG will have a different CA. So if I accept the conservative TG (a part of the Match 3 shared segment), what different Ancestor can I find for all of the “leftover” shared DNA segment pieces of my DNA.
Complex – One complex part of this analysis is what about the parts of true segments from Match 1 and 2 and 4 that are not in the full TG I show in blue? I focus on my DNA, but I think every true Segmentologist should try this experiment with say Match 2 at GEDmatch. Use Segment Search to find other Matches who share the same segment and build the TG for Match 2 – it “will” be different than my (or your) TG. A little different or a lot different? If Match 2 is a known cousin, the same MRCA would almost always apply. By doing this with other Matches in a TG, many of us (working together) are building a larger segment of the CA.
Imprecise – I’ve blogged about fuzzy data. I counter this with judgment. I look at all the segment data for a TG (all my segments are in one spreadsheet). Among the TG fuzzy start data I decide on a specific Mbp start location. Then I decide on a Mbp start location for the next (adjacent) TG. Often some shared segments from the initial TG will “spill over”, past the start of the next TG. The small amounts of spillover, I just ignore: fuzzy data. If there is a large spillover, I’ll consider if the second TG is potentially closely related to the first TG, or not.
Imprecise – This also describes the fact that all your shared DNA segments may not “cover” all of your DNA neatly, or uniformly, or even completely. The shared DNA segments are independent and random – they are not at our beck and call… They don’t necessarily help us fill the gaps perfectly. They are what they are – they are clues we must use as best we can.
All of the above is to indicate that all IBD shared segments should have a home in a TG, and that all the TG segments should cover all of your chromosomes, IMO. Remember, at each generation, all of your segments from that generation must add up to all your chromosomes!
Another aspect of this which I muse about is the SNPs – thousands of them in a unique arrangement in my DNA. Let’s say Match 1 shares 2,000 SNPs with me. Alone we would say the shared DNA segment between us (green) came from a Common Ancestor. Similarly we would say the 3,000 SNPs in the shared segment with Match 2 was from a CA. I don’t see how we could argue that these two CAs were somehow different. I think it is much more likely that the CA is the same, and Match 1 just didn’t get the full segment that I did and Match 2 did. Match 3 is in the middle of all these SNPs – surely Match 3 got the same SNPs from the overlapping locations. By comparing the SNP values of all 4 Matches, I’m confident that we’d find the same values at each SNP location.
Note: all of these Matches and evaluations are based on separated cousins. Of course close relatives could have the same segments and SNPs – the whole concept of segment Triangulation depends on an analysis of more distant relationships.
My summary:
The TG Group of Matches should all look for the same Common Ancestor – and hopefully help each other toward that goal.
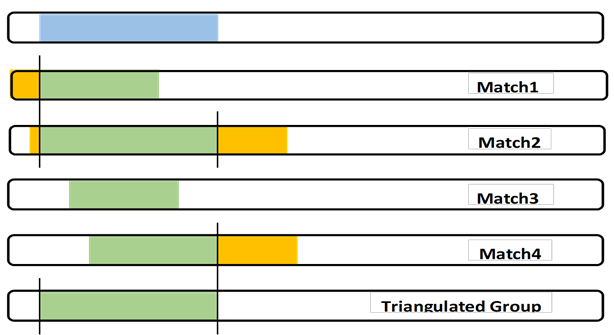
The full TG segment (blue) is my DNA segment, which I can use as part of my Chromosome Map. It defines my crossover points. Also I can contribute my SNPs to any larger study of my Ancestor’s DNA.
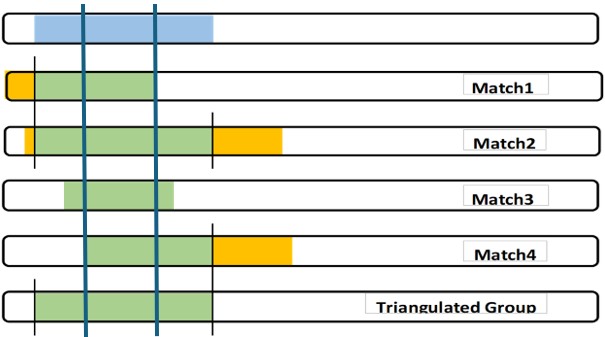
I must be careful to not state that my Matches have this TG segment. Matches will have their own different, but overlapping, TG segment.
The Common Ancestor almost certainly passed down a larger DNA segment, through at least some of their children, which different descendants (including some of my Matches) got. Note: there may be other descendants who have DNA tested who may share with the TG Matches, but not me (I am not the center of the universe…)
[08Ab] Segment-ology: Boundaries of a Triangulated Segment Part 2 by Jim Bartlett 20250915