
A How-To Example with MyHeritage
This blogpost will walk you through the steps to Triangulate your shared DNA segments at MyHeritage – creating a Triangulated Genome. You can use this same process at 23andMe and roughly the same process at GEDmatch and FTDNA. Disclaimer: This Process takes time (I estimate about 120 hours); but once you are done, you have a powerful tool.
The objective of Triangulating Your Genome is to determine 300-400 Triangulated Groups (TGs), adjacent to each other, covering your 44 to 46 Chromosomes from beginning to end. These TGs group almost all your shared DNA segments, cull out most of the smaller false “shared” segments, and identify recombination/crossover points where your DNA shifts from one Ancestor to another. Each TG will represent one segment of your DNA (equivalent to a phased segment), which came from a specific Ancestor, down a line of descent to one of your parents and then to you. This is segment-ology in a nutshell.
The Process
I will describe this process briefly and then in detail, using MyHeritage as an example.
Very brief version – group segments per the Triangulated Segment icon at MyHeritage (see details below). The Main Steps are basically the same for 23andMe, GEDmatch or FTDNA.
Overview – The Main Steps
1. Download the Segments from MyHeritage
2. Set up the Spreadsheet (headers, set a threshold to cull out small segments, add columns, etc.)
3. Group the Segments (the main, long, process – estimated time: 120 hours)
a. Note any known Shared Match relatives as you go – they help later.
4. Summarize the groups (add a header row and ID# for each group, etc.)
a. Assign partial TG-ID: Chr# plus A-Z (depending on Start location)
b. NB: At this point you should have 300-400 groups. Each group represents one segment of your DNA from a specific Ancestor. This is very powerful information and is useful in its own right. Assignment, in the next step, makes each group even more powerful.
5. Assign groups into TGs – genealogy, logic and/or judgment required
a. Assign each group to a maternal or paternal side.
b. Use Genealogy; logic; “spanning” segments; TG “linkage“; ethnicity, etc.
c. NB: Not all TGs may be determined.
6. Enjoy
In the following sections I will describe each of these 5 steps in more detail.
Section 1 – Download the Segments
Log into MyHeritage and click on the DNA tab.
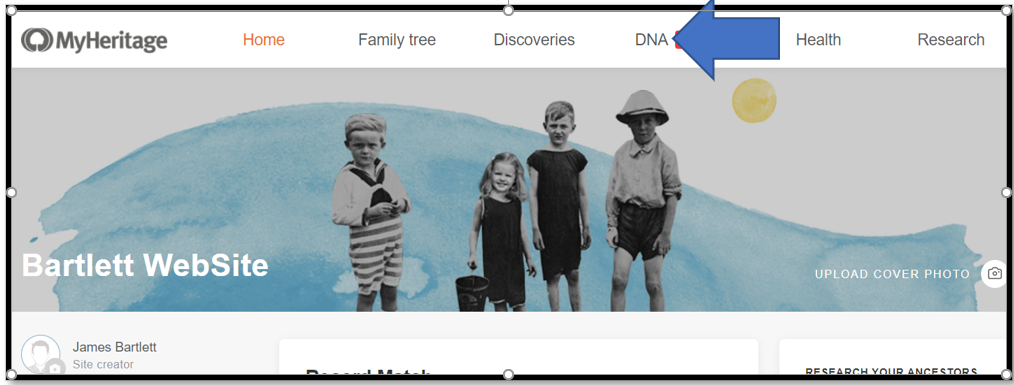
A menu comes down – click on DNA Matches to get:
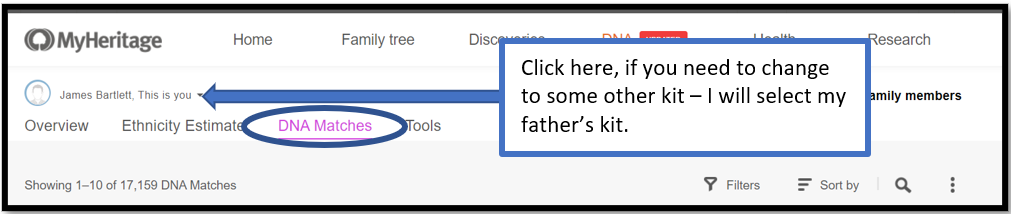
Select the kit you want to use – for this example I will use my father’s kit, which I had not Triangulated at MyHeritage before.
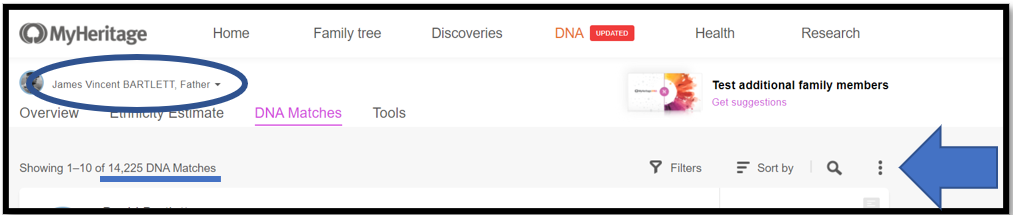
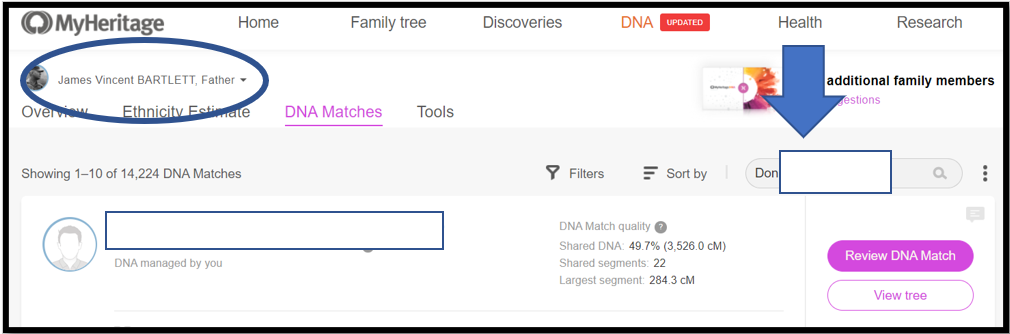
Here is my father’s page – note 14,225 DNA Matches. Click on the 3-dot ellipsis on the right.
From the menu select: Export shared DNA segment info for all DNA Matches. Note the little Triangulation icon.
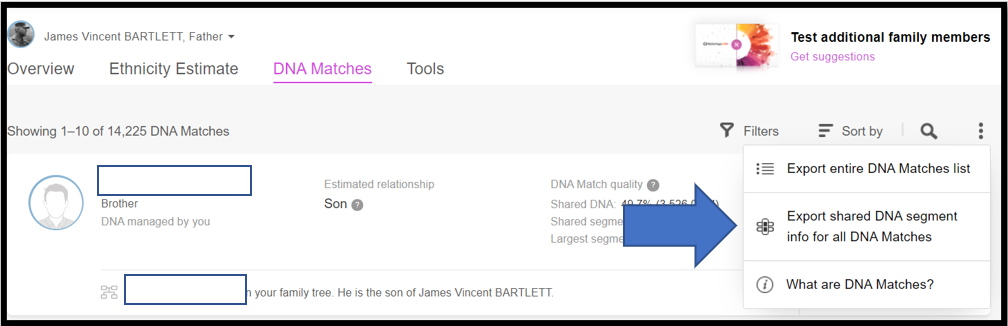
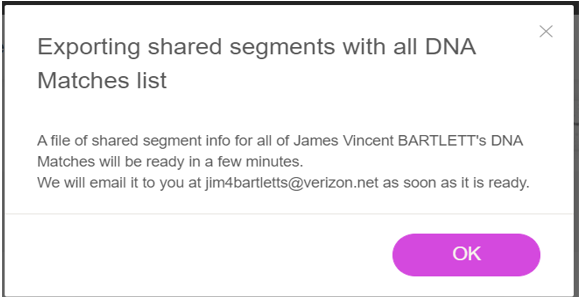
You should get a pop-up with a note that the spreadsheet will be mailed to you in a few minutes:
Section 2 – Set Up the Spreadsheet
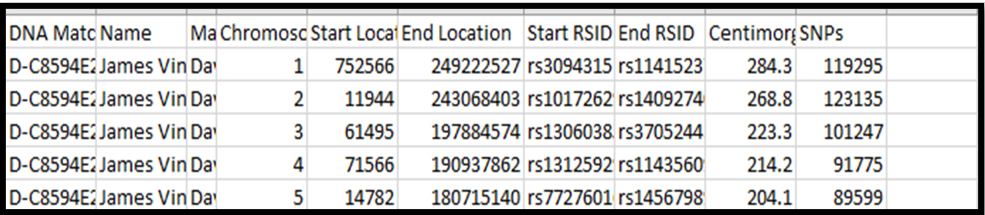
Here is, generally, what your spreadsheet will look like:
Notes:
1. Save this CSV file as a spreadsheet. I normally include a date in the title (e.g. JVB MH Segs 20201225) I tend to save various versions during this whole process – as backups.
2. The headers are: DNA Match ID [you’d only need this in case of 2 Matches with the same name]; Name [base person with all the Matches – usually you, but in this case my father, James Vincent Bartlett]; Match name [name of each Match – I reduced the width of this column to hide the names for privacy]; Chromosome; Start Location; End Location; Start RSID; End RSID [these RSIDs identify a SNP – useless info to me]; CentiMorgans; and SNPs.
3. Make a backup copy of this spreadsheet – just in case…
4. Delete the Start RSID and End RSID columns.
5. Move the DNA Match ID column to the far right side [out of your way].
6. Insert two blank columns on the left side; and 10 columns to the right of the SNP column.
7. Divide Start and End Locations by 1,000,000 – changing them from bp to Mbp. This will not change the accuracy of anything (all the digits will remain), but it will make it much easier to analyze and deal with these numbers. [My process for this: create two blank columns next to the Start and End columns – let’s say Start is column F; End is column G; the new columns are H and I; and the first row under the header is 2. Then in cell H2, enter: +F2/1000000. Then copy this cell [drag it] to column I. Check to ensure the numbers in H and I are the same numbers in F and G divided by 1,000,000. Now copy cells H2 and I2 to the bottom of the spreadsheet. Next highlight all these numbers: H2 to the last number in row I. Copy that data (Cntr-C). Move the cursor to F2 and right click on it. From the menu, click on the Paste Special icon with 123 in it (that means copy the result, not the formula). All of the data in columns F and G should now be in Mbp, and columns H and I can be deleted.]
8. Sort the spreadsheet by CentiMorgans.
9. Select a cM threshold, and remove [or physically separate to the bottom of the spreadsheet – out of your way] all segments under your threshold. In my case I used 10cM. This removed about 2/3 of the segments, leaving a group with larger cMs that I would be working with. A lower threshold of 6cM or 8cM will greatly increase the time for this process – not recommended. A higher threshold of 12cM or 15cM or even 20cM will shorten the time, but will leave more gaps. Your choice! By keeping these smaller segments separated at the bottom of the spreadsheet, they are still available in case you want to use some of them later. If you delete them, that’s OK – you can always retrieve them from a backup copy.
10. Type in Header titles*: Hd (for headers); Co (for Company); ID#; Par (for parent initial); Sib (for sibling initial); Ch (for children initial); Czn (for close cousin initial); TG (for Triangulated Group); G2 (for generation 2: parents – the “side”); CA/Remarks (for Common Ancestor or any other remarks you want to save). See the example below. *Each of these will be explained more fully, later.
11. Add in “header” rows for each Chromosome – see example below. This is just a visual separator that helps separate the segments by chromosome.
12. Now sort the “over-10cM” part of the spreadsheet by Chr and Start. Remember to highlight the full rows whenever sorting to keep the data in each row with the correct Match.
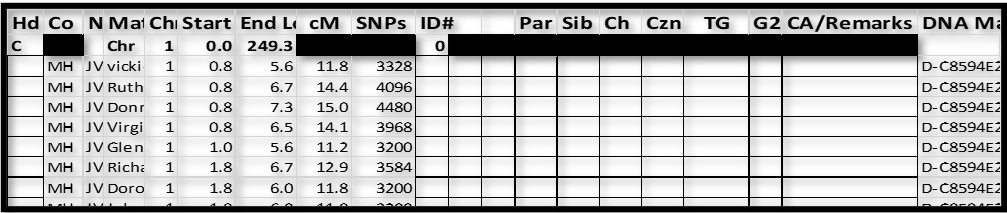
Resulting spreadsheet:
Notes:
1. I’ve inserted MH (for MyHeritage) in the Co column. This is not important if you will only use data from one company. Eventually I will add data from GEDmatch, 23andMe, and FTDNA, and I want to be able to sort by company from time to time.
2. There are 2 columns between ID# and Par – these are “extra” and sometimes come in handy when grouping – specifically when one group overlaps another group.
3. The Chromosome header row provides a visual demarcation between chromosomes.
This Chr/Start sort puts all overlapping segments adjacent to each other in the spreadsheet. NB: some of these will be on your paternal side; some will be on your maternal side; and a very few (usually under 15cM) will not Triangulate with either side, indicating they are probably false. Under the next section you will form groups, and each group will be on one side or the other. We cannot know, just by grouping, which side they are on; but we do know all the segments in a group will be on only one side.
Section 3 – Group the Segments
This part is hard work. It’s not difficult – the grouping process is fairly straightforward. But I cannot sugar coat it – it is tedious. I used a stop watch to time each chromosome, and I got better (more Mbps grouped per hour) as I progressed through the Chromosomes. In total it took me 120 hours – a table of hours is at the end of this section.
You can start anywhere. I started at the top of Chr 01 and just worked down (I knew I was going to do the whole thing). In hind sight, you might want to start with a medium or small Chromosome, to develop your “rhythm” – to get your “sea-legs” as we say in the Navy. The two ends of a chromosome are often the hardest – so you may want to just start in the middle of one. Later in this blog post I’ll include some other observations. But for now, just start…
Pick a Match at, or near, the top and put a one in the ID# column. This is the base Match for a while.
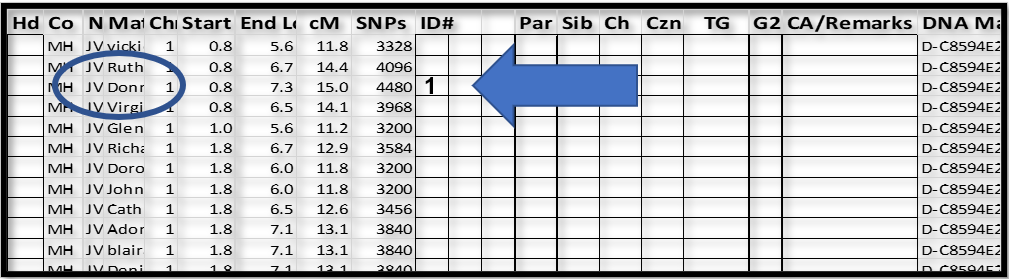
I picked “Don…”, the third Match down, because the segment started where the other’s did, but was a little longer. This segment was more likely to Triangulate with others further down the list, whereas the top Match, “vicki”, ending at 5.6Mbp, may not overlap enough with many of the others. It’s really a matter of efficiency. In the end, we are going to “touch” all of the above-threshold segments in the spreadsheet. As you’ll find, it’s easier to get set up with one base Match and “touch” as many as you can, before you have to regroup and start over with a new base Match. NB: Once a Match-segment is “touched”, and added to a group, it does not need to be selected again later. However, use any order that suits you.
So now “Don” is our base Match. Next we search/select Don at MyHeritage (we’ll use his full name, and check the cMs of the shared segment – just in case there there is more than one Match with the same name (I found about a dozen such cases).
This is where two monitors really helps. Put MyHeritage (from the internet) on one screen and your segment spreadsheet on the other screen. From your spreadsheet, copy the Match name cell for “Don…” which has the full name, exactly how MyHeritage has it. Then paste this into the search box at MyHeritage.
Notes:
1. At My Heritage, my father’s name is circled top left – it’s his genome I am Triangulating
2. Don’s name info is copied into the search box – “Don” is the base Match this time
3. Next: See Downward Arrow and Click on the name; or click on the magnifying glass in the Search box to get a list of Matches per the search criteria. Often the name you want will be the only Match listed. However, sometimes multiple options will be listed and you have to select the correct one (usually the amount of shared DNA will help). Match names like Thomas Jones may return hundreds of Matches – in that case, I punt – and go back to the spreadsheet and select a different Match as the base.
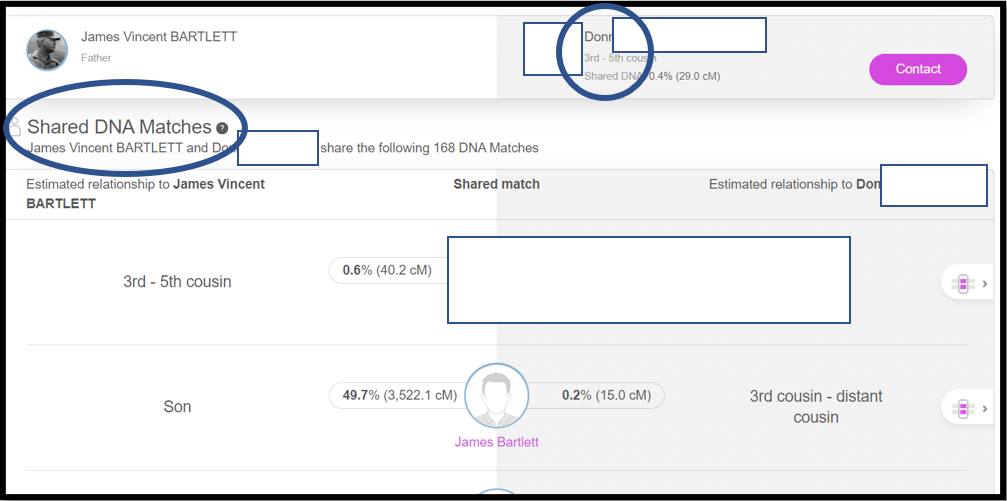
4. Once you’ve selected the correct Match, click on the colored link: Review DNA Match. This will call up a long page focused on that Match. Scroll down past Theories, Smart Matches, Shared ancestral surnames, Shared ancestral places, etc. until you get to the section called: Shared DNA Matches. See below:
Notes:
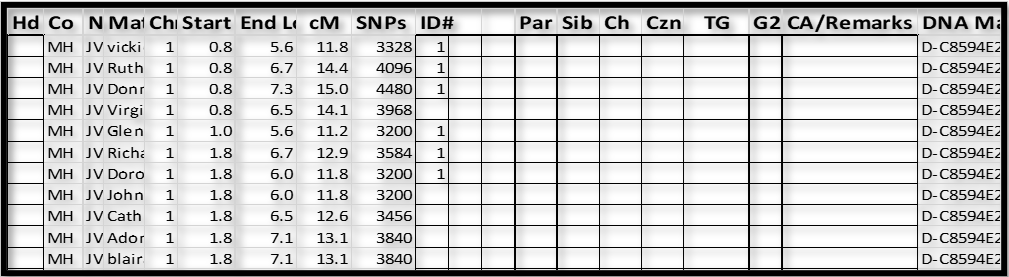
1. This is the top of the list of 168 Shared DNA Matches between my father and Don. The top two Matches are a close relation to Don and a close relation (me) to my father. Please note the “triangulated segment(s)” icon to the right of these two Matches. In this case Don shares two segments with my father, so I need to click on the icon to insure each Shared DNA Match is sharing the DNA segment at the beginning of Chromosome 1 in the spreadsheet. Scroll down the Shared DNA Matches at MyHeritage, noting which ones share a triangulated segment on Chr 1, and note them with a digit in the ID# column:
Notes:
1. Don and 5 other Matches are shown here as sharing a Triangulated Segment with my father. Indeed, Don matches my father, and each of the Matches also match my father and Don. This is Triangulation in each case; and as a group, they form a Triangulated Group (TG).
2. At the bottom of the first page of Shared DNA Matches (each page has 10 such Matches), keep tapping on “Show more DNA Matches”, until you get to the bottom of the list. The Shared Matches are roughly listed in by total amount of shared cM, so by going to the end of the list you will pick up the shortest Shared Matches. I think this method is the most efficient in “touching” all the Match-segments.
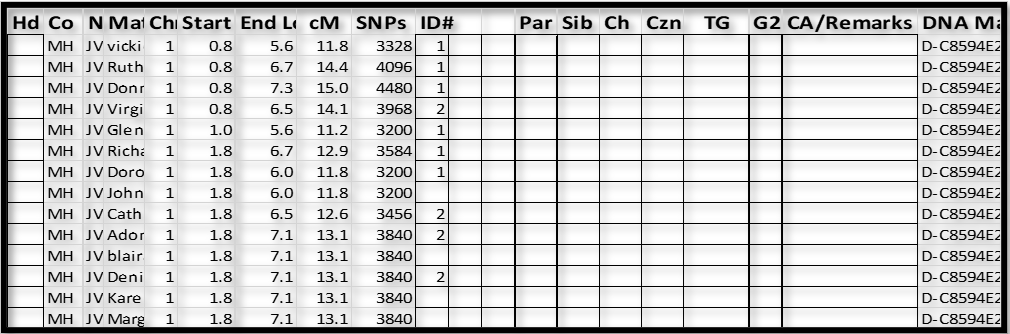
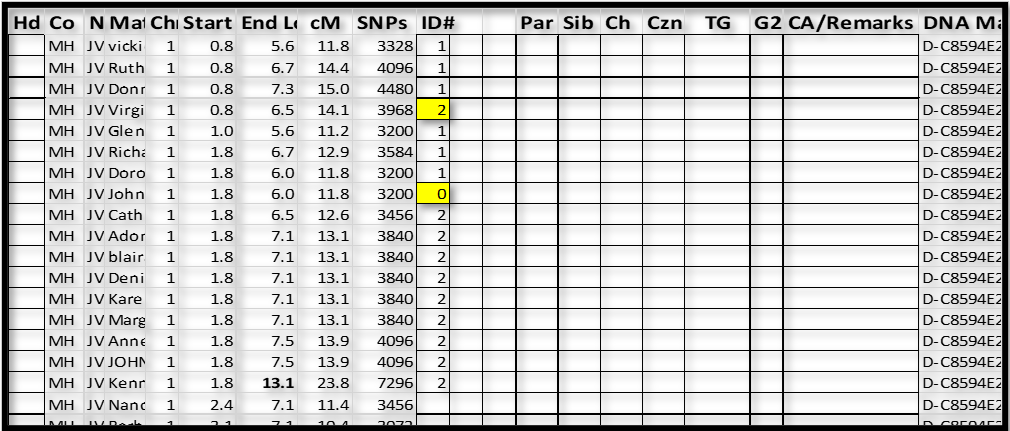
I then picked “Virgi” as the next base Match; copied that name from the spreadsheet cell; pasted it into the search box at MyHeritage; selected the correct “Virgi” from the list of Matches that came up; clicked the “Virgi” Review DNA Match link; scrolled down the resulting pages; and reviewed the Shared DNA Matches between my father and Virgi who had a Triangulated Segment icon. I noted all of them with a “2” in the ID# cell.
Notes:
1. It’s easy to see that the group with ID# 1 and the group with ID#2 overlap the same area on Chr 1 – one of these groups is on my father’s paternal Chr and the other is on his maternal Chr. At this point we cannot tell which is which – more on that in Section 4.
2. I then tried Match “John” and drew a blank – “John” did not have any Shared DNA Matches who had a Triangulated Segment icon for Chr 1.
3. Next I tried “blai” as the base, and “blai” had some icons with Matches who already had a 2, and some new Matches. So we now have:
I now paused to re-sort this part of the spreadsheet – I sorted by ID# and Start. This moved “John” to the top (out of the way – as almost certainly a false segment); and clearly showed the ID#1 and ID#2 groups:
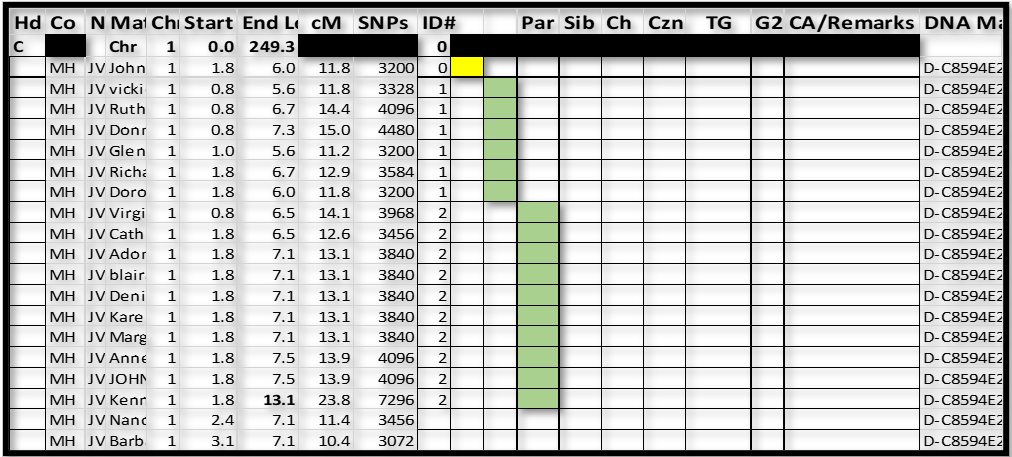
Notes:
1. The color coding in this figure is just to highlight the two groups. I do not do this in actual practice – I let the sorted ID#s speak for the groups.
2. Select the next, ungrouped, Match-segment, “Nanc”, and repeat the process.
3. For ID#, use the numbers 1 to 9 first, then the letters a to z – they will all sort in order.
Grouping Mantra: Select a base – group segments – repeat…
A quick summary of these steps:
1. Select the next base Match in your spreadsheet
2. Copy the Match name
3. Paste the Match name into the search box at MyHeritage – and execute the search
4. Select the Match from the ones listed and click on “Review DNA Match”
5. Scroll down the resulting page to Shared DNA Matches
6. Look for Matches with the Triangulated segments icon
7. Verify it’s the spreadsheet segment of interest (same cMs as in spreadsheet)
8. Type in the ID# character (1 to z) in the spreadsheet
9. Continue down the spreadsheet per steps 6-7-8, until the last Shared DNA Match
10. Repeat from #1.
Notes:
1. Generally pick the next Match in the spreadsheet as the next base. However, if it is a common name, or if it’s a very small segment, or if that Match turns out to share several segments, feel free to select another Match, near the top of the list, as the next base.
– this makes the process go faster
– a skipped Match will often show up as Triangulated later in the process
2. At the end, you can always go back and pick up any “stragglers”. These “stragglers” will usually be smaller segments, which would usually have a very distant Common Ancestor – I’ve actually just abandoned some of these, and moved them to the bottom of the spreadsheet with the under-10cM segments.
3. Be careful with Matches with multiple shared segments – click on the TG icon to insure the TG segment agrees with the area you are working on. TIP: Note the total cM of the Match (with a TG icon) at MyHeritage – if that is the same cM as the Match in your spreadsheet – all is OK – you’re dealing with only one segment and it has to be the one you want. Most Match-segments will be like this.
4. Some groups may be very small, and some may be very large. Many 10-15cM segments in a group may indicate a pile-up which is probably very distant – but at least you’ve grouped these segments to highlight that probability.
5. Don’t worry if the ends of some groups overlap the beginnings of other groups – the company algorithms cannot identify the crossover points precisely – these ends are fuzzy.
6. In my experience, MyHeritage Triangulation has never been incorrect. However, in some cases, segments that should Triangulate are not identified (a false negative), although those segments are almost always identified as Triangulating with other segments in the same group. I think imputation of SNPs is the culprit here. The main point is to put each Match-segment in a group (or cull it out as false).
7. In a few cases the picture got muddled. My best solution is to just skip over this area (these segments) and proceed further down the spreadsheet. Usually the bigger picture becomes clear, and you can return to the problem segments later.
8. Remember the objective of this exercise is to form 300-400 Triangulated Groups, spanning all of your Chromosomes. You do NOT have to adjudicate every shared segment to accomplish the overall goal. The 300-400 TGs are the prize – the important tools that will help you immensely.
Here is a summary of how long it took me to Triangulate each Chromosome:
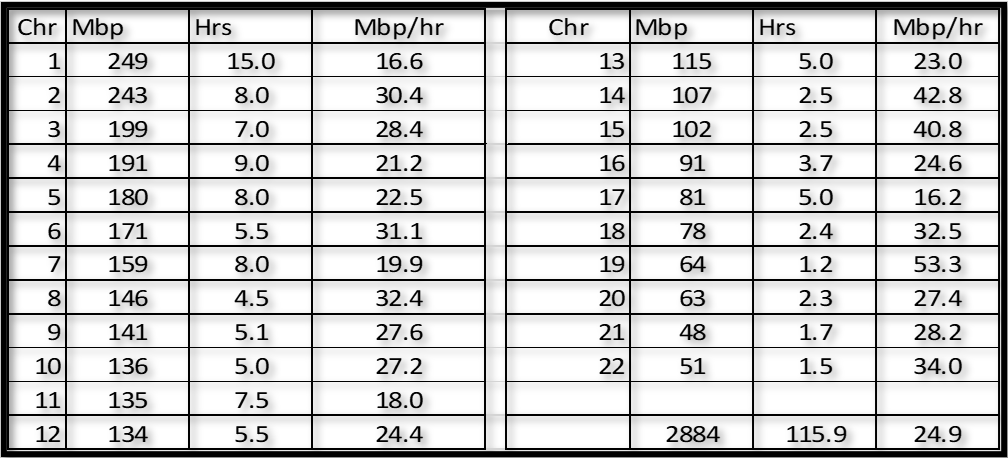
Notes:
1. I rounded my total of 115.9 hours up to 120 as an estimate for most folks. Hopefully you will have the advantage of using this blogpost to be more efficient than I was.
2. Chromosome 1 was a bear! But I was also working out processes and methods…
3. As noted before, you might want to start with Chromosomes 13 to 22. It’s a good feeling when you reach the end of each Chromosome;>j
Other observations about forming groups:
1. The Chromosome tips (Start and End of each Chromosome) usually have short TGs, and they are sometimes hard to figure out. For a few of these Chromosomes, I actually shifted to the middle of the Chromosome in the spreadsheet, and worked both ways. It doesn’t matter much as every shared segment has to be in one overlapping group or the other (or be false).
2. When searching at MyHeritage for Matches who have the TG icon:
a. If there are only a few Matches (say under 10) in your spreadsheet which could overlap, then just look down the Shared DNA Matches at MyHeritage for the Matches with the TG icon. These few Matches will be easy to find in the spreadsheet – type the ID#.
b. If there are many Matches in the spreadsheet which could overlap, I usually highlight those spreadsheet rows and sort them on Name. This way I can start with the Shared DNA Match name at MyHeritage (with a TG icon) and easily and accurately look down the alphabetized names in the spreadsheet to find the Match name – then type the ID#. [This advice may be more clear after you’ve tried finding some MyHeritage Matches in your spreadsheet.]
c. At MyHeritage, skip over the Matches which show a total cM less than 10cM (or your threshold) – you’ve moved those Matches out of your grouping spreadsheet.
d. Some Matches with a TG icon at MyHeritage may show, say, 18cM, but they aren’t in your spreadsheet. Upon inspection in the browser, the 18cM actually is two segments and the one you’re working on is below the threshold. Aaarrrrg! False alarm. Skip over that Match and continue looking for TG icons.
e. These are my tips – or discover your own “most-efficient” way to find TG Matches at MyHeritage and then find those Matches in your spreadsheet to type the ID#.
3. From time to time, re-sort the Chromosome you are working on. Within a Chromosome, you can sort on ID# and Start location (they sort from 1 to z). This keeps the groups together and quickly shows you the remaining segments to work on.
4. Long segments. Sometimes a long segment will stretch beyond the bulk of the other segments in a group. This usually indicates a closer cousin, with a shared segment that spans across two (or more) segments. This is OK. Later, a segment in an adjacent group may also show a TG with the long segment. I tend to keep the groups separate, because they will probably come from different Common Ancestors down to you, through one closer Ancestor. The long segment is an important “tell tale”, indicating both groups are on the same side, and closely related.
5. Most “tell tales” will come from known close relatives. These are parents, children, siblings, avuncular, close cousins and Theories of Family Relativity (ToFR) that you agree with. Parents, avuncular, cousins and ToFR are particularly useful in identifying the side of a TG. Children and siblings tend to share long segments on one side or the other – usually through several TGs and sometimes over an entire Chromosome. Use the Par, Sib, Ch, and Czn columns in the spreadsheet and type in initials (or other identifier) for these known relatives as you find them as Shared DNA Matches with TG icons at MyHeritage (check the browser to ensure they share on the right segment). I note a Match ToFR in a spreadsheet column for Common Ancestor/remarks. These will help you later.
6. Even with a lower threshold of 10cM, some of the 10-15cM segments don’t always match others as they should. I note that MyHeritage uses imputation to add “most probable” SNPs, in order get larger, more complete segments. But I recall that they don’t use these inputed SNPs when they declare TGs – so even though there is an overlap, sometimes MyHeritage won’t indicate a TG. As a result, not all overlapping segments in a group with show with a MyHeritage TG. I got used to it. After all, every shared segment has to be from one parent or the other (or be false). So if a segment shows as TG with several others, it’s probably true, even if it doesn’t match every segment it “should” match. If you get frustrated with a Match-segment in your spreadsheet, just code it ID# 0. You can ignore it now, or forever. It saves time to “skip over” problem segments.
7. MyHeritage appears to be throttling the Shared Match list after an hour, or so. The “Show more DNA Matches” sticks on the timer and doesn’t show the next list, and/or the next page just hangs up looking for TGs – in either case, you cannot find any more TGs. Options:
a. Click on your browser refresh icon (top left).
b. Use the back arrow, and try a different Match.
c. Turn MyHeritage off; and then back on.
d. Try again 8-12-24 hours later… I was always able to start fresh the next day.
e. Maybe just be content with working on this project an hour a day.
8. Order is not a factor – you can literally work any area of your spreadsheet you want, in any order you want. But the objective is to cover the whole genome eventually.
9. Extra Credit – determine the number of segments: In the beginning, before sorting out the small segments from your spreadsheet, add a column called “Seg”. Then sort the entire spreadsheet by Match name DNA Match ID. Put a 1 (the number one) in the “Seq” column for the whole spreadsheet – most of your Matches, by far, will only share 1 DNA segment with you. Then scroll down the whole spreadsheet and change the 1 to the number of segments each Match shares with you. Yes – this is tedious; but this information (number of segments a Match shares), is very helpful in selecting a base Match, or even understanding that there are multiple segment. However, this is NOT a required step for the overall process.
10. Don’t get discouraged – this whole process gets familiar and easier as you gain experience. Take frequent breaks. The end result is worth it.
Section 4 – Summarize the Groups
When you are done grouping all the segments, take a well earned break! The tedious part is over. This section is easy and a little fun… We are going to insert a header row for each group. We still don’t know which side (maternal or paternal) each group is on, but we do have the Match-segments in groups. I estimate you will get about 300-400 of them.
See the figure below:
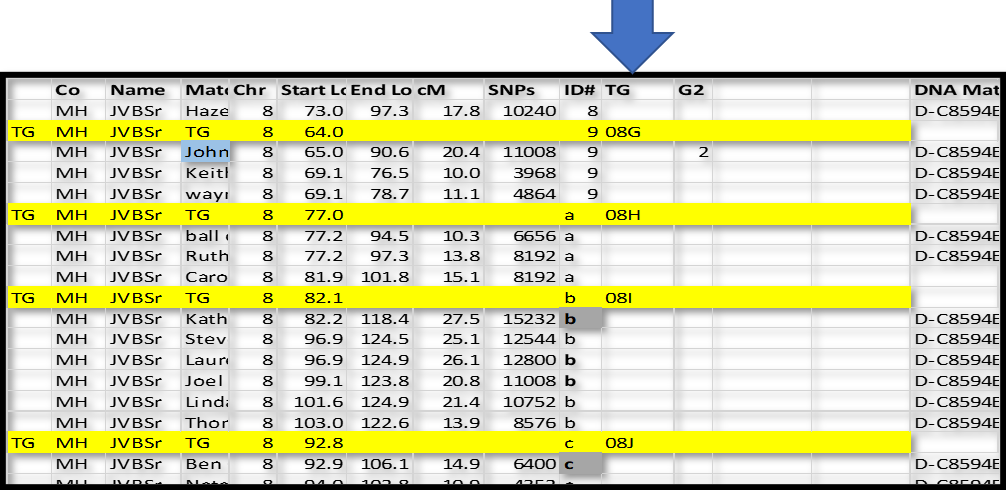
In this case, I inserted a new row just above ID#9 in Chromsome 8. I like to use a highlight color. For these “group” rows, add TG in column A; and TG in the Match name column; type the Chromosome number in that column; and the ID# in that column. In the Start Location column type in a number just a little bit smaller than the first segment – I typed in 64.0 over 65.0 for ID#9 and 77.0 over 77.2 in ID#a. The idea is that I can sort the spreadsheet by Chr, ID# and Start and always come back to this list with all the Match-segments sorted in their respective groups.
Repeat for all 300-400 groups. NB: There will always be two groups that start at the beginning of each Chromosome – one for each side. For each of these group headers, use .001 for the Start location – this will sort before any Match-segments and after the Chromosome header (which Starts at 0.0).
Now we can also assign the first three characters to name this groups as TGs.
– The first two characters are the Chromosome number: 01 to 23
– The third character is a letter indicating where the group starts:
A for 0 to 9.9Mbp; B for 10.0 to 19.9Mbp; C for 20.0 to 29.9Mbp; etc.
Here is an example:
In the next section we can start assigning the TGs to sides…
Section 5 – Assign Groups into TGs
This is the final section. After all of the tedium of grouping segments, we now come to assigning these groups to a maternal or paternal side. As mentioned before, each group represents part of your DNA – on one Chromosome or the other. Each group is DNA from your maternal side or your paternal side. The segment data, by itself, doesn’t provide a clue. We cannot assign a side without additional information. We need to use genealogy.
The main method is to use known relatives. If you’ve tested at least one parent, that is gold at this point. You can pretty quickly determine all the shared segments which include that parent, and the remainder would be with the other parent. I used that method to Triangulate my own genome – I have my father’s atDNA, which was a huge advantage. But now, I’m working on Triangulating my father’s genome – his parents, and their generation, are long since gone. So, in this case I have to rely on known relatives. And we can use logic in some cases – more on that later.
There are some workarounds… For instance someone who is half English or half Ashkenazi Jew or half Scandinavian or half Asian or half African… we might be able to tell from the Match names (or Ancestors) in each group which side they were on. It’s a stretch, but perhaps one parent has New England ancestry, and the other parent has Colonial Virginia ancestry… We’d need to really dig into the Trees of many Matches in each group to tease this information out.
I like using Ahnentafel numbers, so I assign the number 2 for the paternal side, and the number 3 for the maternal side. Alternatively, use P for paternal and M for maternal.
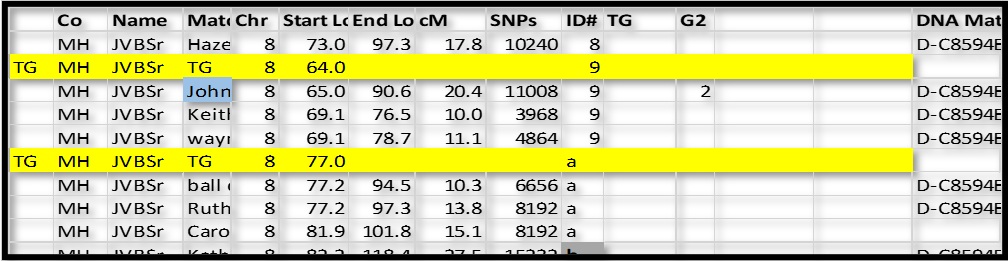
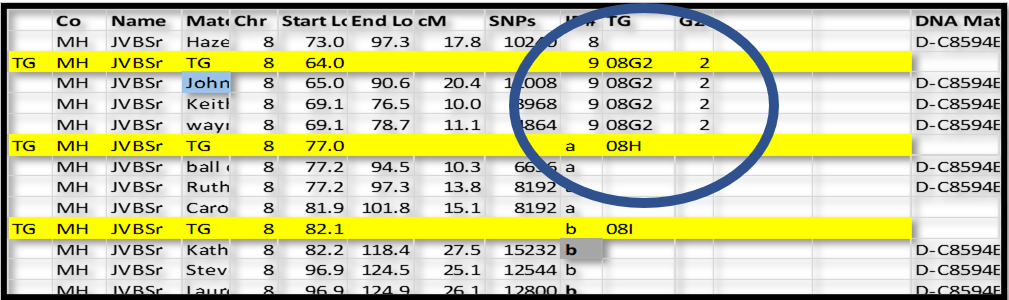
In the following example, I have a close paternal cousin of my father – John. Wherever I found John, I could add 2 (for paternal side) to a column I called G2 (for the second generation, which are the parents).

I know that the ID# 9 group he is in must also be paternal (they all share the same Common Acnestor). I can add a 2 to the TG ID and assign that TG ID to each segment in that group:
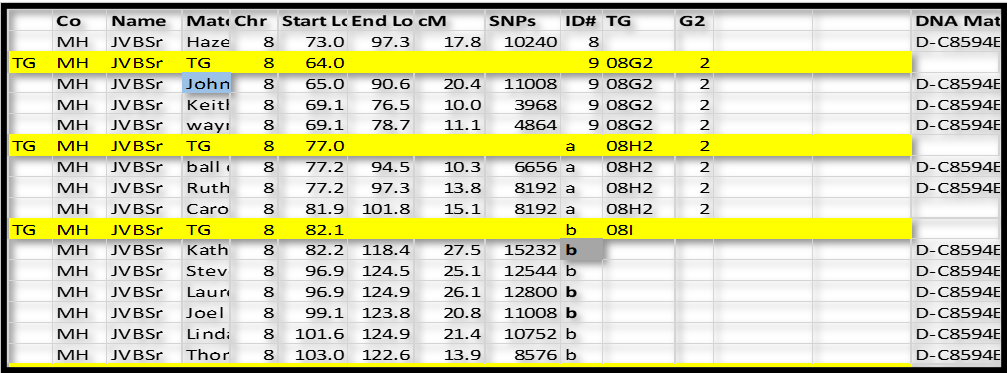
All of the shared segments in group ID# 9 are now assigned to TG 08G2 and G2 = 2 (paternal side). This 2 on the paternal side is important because, later, I can separate all my segments into paternal and maternal sides, and very easily see how they are adjacent (or not) to each other. They should be adjacent to each other, and this kind of a sort will highlight any gaps.
Next, we will use some logic. TG 08G2 ends in the 76-78 range (discounting close cousin John’s long segment ending at 90.6 – which close cousins often overlap to the next TG). Group ID# a starts at 77.2, which looks like a good “fit” – a little better than the 82 to 96.9 range in Group ID# b. So, I’m going to conclude that ID# a is a continuation on the 2 – side.
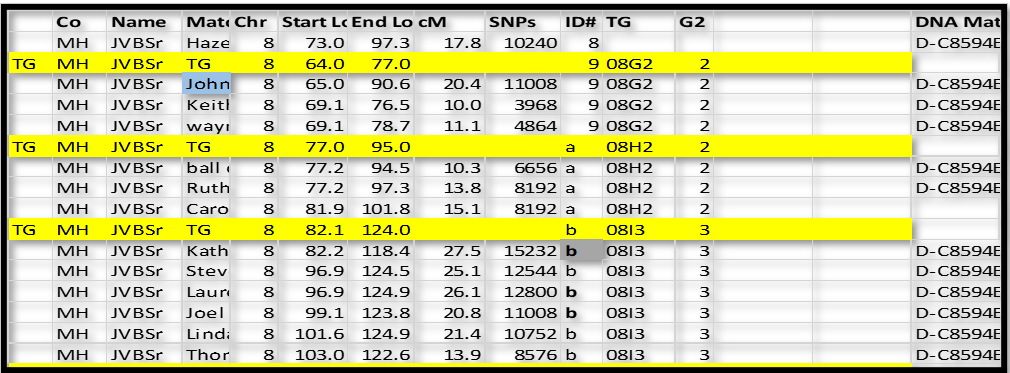
Continuing with this logic, group ID# b clearly overlaps ID# a (side 2) by a lot. So it must be on the other side – side 3. So we now have TG 08I3.
We actually have several different ways to make these assignments:
1. Common Ancestors:
– The best way to make assignments is with known close relationships which tell us which side a group is on. Parents, aunt and uncles, and close cousins are strong indicators.
– MyHeritage also offers Theories of Family Relativity (ToFR). My experience with them is mixed – some are clearly correct (they agree with my 46 years of research); some are completely bogus. So, heed the correct ToFRs, and make assignments to a side accordingly. Ignore the bogus ToFRs.
– Also use Common Ancestors with Matches which you work out on your own and are confident about.
2. TG “Fit”: Examine the rough Ends of TGs and see where they fit with the Starts of subsequent groups. All of these groups and TGs have to fit together somehow. None can significantly overlap any others on the same side.
– However, allow close cousins with long shared segments to overlap.
3. Siblings and Children: Not illustrated here are the use of siblings and children. They tend to share very long segments on the same side – spanning several groups or TGs. So, also follow those patterns, which “tend” to stay on the same side from TG to TG.
4. Ethnicity and Geography: As previously discussed, you can also use ethnicity in some cases. You can even make a case for geography – if one side has some unique geographic roots that set it apart from the other side.
5. Other companies & Matches: I should also make the case for Matches from other companies. I’ve done most of my father’s genome, and now I’m reviewing his Matches and known Common Ancestors from FTDNA and GEDmatch and figuring out most of my father’s remaining TGs. The genome we work with (usually our own, but in this case my father’s) is fixed – the recombination crossovers are determined before birth, and don’t change. Although the companies may test a different set of SNPs, the 300 to 400 Triangulated Groups should stay the same. The start and end of each TG may be a little fuzzy, but the bulk of the TG still comes from a specific Ancestor, down a line of descent to one of your parents to you. Don’t worry about the fuzzy ends – think about the thousands of SNPs in a TG coming from an Ancestor.
6. Painting and Clustering: If you use DNA Painter or Clustering and determined a side for some of your Matches, use that information.
Other observations:
1. Double up on all the Chromosome headers – there needs to be two for each Chromosome – one paternal (put a 2 in the G2 column) and one maternal (put a 3 in the G2 column).
2. Something I thought about, but haven’t tried, yet. Set the threshold at 20cM and Triangulate those segments fairly quickly (you would skip over a lot of Matches with TG icons who shared less than 20cM). Then re-sort the full spreadsheet and set the threshold at 15cM – then re-sort the 15cM+ spreadsheet by Chr and Start. This has all the segments in order, but the paternal and maternal sides are comingled with the new 15-19.9cM segments. These new segments should be easy to Triangulate other segments already identified with TG IDs. I predict some of the larger TGs will be subdivided in this process. Then drop the threshold to 10cM and repeat. That would take 3 passes through the whole genome, but it may go faster than by starting with a 10cM threshold. Maybe I’ll try my brother’s MyHeritage kit that way…
Section 6 – Enjoy
This in a MAJOR MILESTONE in Genetic Genealogy. Now that you’ve put in the work to create 300-400 TGs that cover your genome, enjoy the benefits of this great tool!
1. All new shared segments (from any company) should quickly and easily fit into an existing TG. You have the framework for organizing all your Match-segment data.
2. Each TG comes from a Common Ancestor – even ones behind a brick wall… Review the blogpost: Let the Matches Tell Us the Cluster Common Ancestor here. TGs, just like Clusters, are groups focused on a Common Ancestor, and the Matches in a TG may be able to tell you who the Common Ancestor is.
3. When you know which line a TG is from, tell your Matches! Focus on your Matches’ Trees to find that line. With that focus, I have found a collateral line in a Match’s Tree and built it back to our Common Ancestor – many times.
4. Walk the Ancestor Back within each TG. See here.
5. Pile-on (not pile-up). In several TGs I’ve gone back to the Matches asking if they had a particular Ancestor in their Tree. Even when they had no Tree, they sometimes confirmed that Ancestor I was focused on. I’ve collected dozens of Matches who all share the same Common Ancestor with me. I’ve done this with a growing number of different TGs. This is very strong evidence that the DNA segment (represented by the TG) is from that Common Ancestor.
6. Play with these TGs. You can easily use DNA Painter to paint the TGs! All the Matches in a TG could also be painted if you want. Think about Painting virtually every one of your Matches…
7. You can easily use the G2 column to sort your TGs into a paternal side and a maternal side.
8. As mentioned before, add the data from other companies. Consolidate all your Matches and segments into one comprehensive spreadsheet.
The End of Triangulating Your Genome
I’ve enjoyed putting this blogpost together, and sharing some of my concepts on Triangulation. If you try this, please post some comments about your experience and/or any suggestions for improvement.
[10A] Segment-ology: Triangulating Your Genome; by Jim Bartlett 20201229
