My recent blogpost on Walking The Clusters Back (WTCB) is here. This is an advanced topic and process which involves homework before you start. The idea is to start with your closest known Matches in several Clusters (maybe 5 to 10). Then gradually decrease the lower cM Threshold in order to “follow” the known Ancestors in your Tree; back to Most Recent Common Ancestors (MRCAs) with Matches; and impute these “Root Ancestors” (your parent, grandparent, etc) to the other Matches in each Cluster. The linked blogpost provides a spreadsheet template. In practice the initial Cluster runs are fairly easy, but the number of Matches roughly doubles with each run. It soon becomes a time consuming, head-scratching, process (take regular breaks….).
Bottom line: It’s working very well – the Clusters in each new “run” carry over Root Ancestors from previous runs, and the addition of new Matches sometimes extends Root Ancestors.
My plan is to post several more blogs about the details of the process, and the insights I’ve gained doing it. But in this post I want to provide you with two tables of my experience, so far.
1. Summary of Cluster Runs:
I title the Cluster Run by the Lower cM (Lo cM) Threshold. You can see I started with 80cM and reduced by increments down to 23cM. I also adjusted the Upper cM (Hi cM) downward to cull out the closest Matches which become confusing. The Time column is the time it took DNAGedcom Client to produce the 3 data documents (after the initial gathering process). These different Cluster Runs resulted in the number of Matches and Clusters shown. I rolled up some of the very small Clusters – usually, but not always, into the main Cluster in a Super Cluster. At the end of my analysis, I had the number of Clusters in the Net CL column.
I note that although the *average* size of Clusters grows, slightly with each decrease in the lower cM Threshold, this hides that fact that a number of Clusters are in the 50-100+ range. The average stays low because there are a lot of 3-10 Match Clusters. The 250 Clusters in the 23cM run, is approaching the 372 Triangulated Groups I have already established over all of my DNA. My TGs also range from small to large groups…
2. Listing of Root Ancestors in Clusters:
G2 is the parent generation of Root Ancestors – always a 2 or 3; G3 is the grandparent generation (3, 4, 5, or 6); etc. The Ahnentafel numbers represent my Ancestors out to, but not including, a consensus Most Recent Common Ancestor (MRCA) couple between me and the Matches in each Cluster. Many of these MRCAs are from Ancestry ThruLines and were validated by me (I find about 5% of my ThruLines hints are incorrect and they are not included in my Notes or in these Clusters). I’ve done the “homework” of including all the validated ThruLInes MRCAs in the Match Notes, which makes the above List possible.
The above 228 Clusters are about 90% of my 250 net Clusters for this 23cM run (the other 10% don’t have a clear consensus – these cases are usually resolved in the next Cluster run).
The Root Ancestors shown above are a huge benefit in several ways:
A. finding and validating more MRCAs with Matches in each Cluster – there is a clear focus on who I’m looking for, and generally where and when.
B. identifying MRCAs that do not “fit” – they stick out like sore thumbs, in that their RAs clearly do not match the consensus. Sometimes this is resolved because the Match is related to me more than one way, and another way does “fit”. In all these cases I need to revisit the MRCA conclusion. This is a significant Quality Control “opportunity”.
C. Identify other problems: MPEs, ThruLines Potential Ancestors, hypotheses, etc. The RAs in each Cluster really narrow down the alternatives.
So this is a SITREP (Situation Report) of where I am now. The 20cM run is next – adding over 2,500 new Matches (many with MRCAs) – this may take weeks to sort out. Then I will take perhaps an additional 1,000 ThruLines under 20cM and see if I can manually include them in Clusters (if they have Shared Matches). And along the way, I want to post more details and insights about this WTCB process.
[19Na] Segment-ology: WTCB SITREP by Jim Bartlett 20220821
This will be a longer and more detailed post than usual. The process I’ll outline takes a lot of precise and detailed work. And preparation work. You have to decide if it’s worth it for your objectives.
I’ve tried several blog posts about Walking The Clusters Back. In my opinion, they all failed. I was trying to find a sweet spot that would give us groups of Matches at each generation. That generally works at the grandparent level (the Leeds Method works in most cases to provide 4 columns for 4 grandparents), but the Clusters quickly get jumbled up as the cM Threshold decreases. I should have known better. Each Cluster still tends to focus on an Ancestor, but the different Clusters have Ancestors of different generations. The Clusters sort of mirror the Shared cM Project – as the cM value decreases, the Shared DNA Segments come from a wider and wider range of generations. The overlap of possible relationships grows. The Shared cM Segment pattern gets more and more jumbled – just like the Clusters.
So if we can’t use brute force on the data, lets go with the flow, and develop a process that tracks Clusters – by tracking the Matches in them. As the cM Threshold is decreased, the number of Matches being Clustered increases. This results, generally, in more Clusters with more Matches in them.
Overview
Overall WTCB Process:
1. Run a Cluster report with a high cM Threshold (say 80 or 90cM) to get at least four Clusters that you can identify a consensus Most Recent Common Ancestor (MRCA) in each Cluster.
2. From information in the Match Notes, determine the consensus Root Ancestors (RA) in each Cluster. The RAs start with your parent, and include your Ancestors out to, but not including, the consensus MRCA for each Cluster. These RAs should “fit” all the known Matches in the Cluster.
3. Impute (copy) these RAs to all the other Matches in the Cluster.
4. Repeat for all Clusters
5. Run a new Cluster report with a lower Threshold.
6. Combine the Matches from the previous and the new Cluster reports into one spreadsheet.
7. Sort on Match names.
8. Merge the duplicate Matches into one Match (much more on this step later)
9. Return to step 2, and continue…
10. Gradually reduce the upper cM Threshold, to cull out the closest Matches – this fine tunes the MRCA of the Cluster.
As part of this overview, I must provide a warning: there is a lot of homework required before you can start this process – see the Homework section below. The Cluster runs include the Notes for each Match. These Notes should include “known” Match MRCAs and cousinships [including multiple MRCAs], and any TG IDs, that you have determined. This is the information you need to populate your Master WTCB Spreadsheet. This is your source for RAs.
In the paragraphs to follow, I’ll offer a spreadsheet template, and specific steps to accomplish the steps in each Cluster run. It’s a repetitive process that I have tweaked to make it as standard and efficient as I can. The number of Matches about doubles with each Cluster run – so the work gets harder. I’ve also incorporated my short cuts and tips into the steps…
I started with an 80cM Threshold and found 8 Clusters – I was confident I knew the consensus MRCA for each Cluster. More importantly, I knew the Root Ancestors for each Cluster (the RA being the parent and grandparent and sometimes more) back to, but not including, the MRCA). As I lowered the cM Threshold (usually by 10cM at first) and ran a new Cluster run, I found the number of Matches about doubled and the number of Clusters increased. The increases were not in a predictable way, but the Clusters grew in size (more Matches) and slowly, but surely, pushed the RAs out to more distant MRCAs.
I’m now confident this process works. By that I mean for each new WTCB Cluster, we get some RAs which point to the MRCA of the Cluster; and this MRCA is very close to the MRCA we’ll find with each of our Matches in the Cluster. A strong, helpful, clue…
Homework
Some *essential* homework is required before you try this:
ANCESTRYDNA TREE & MATCH NOTES:
1. Test at Ancestry and build your Tree out (as much as you can to 7xG grandparents where possible [you only need Ancestors (use standard names); birth/death dates/places]. AncestryDNA needs this information for ThruLines to work. See some of my posts on ThruLines starting here.
2. Link yourself to your Tree – this let’s AncestryDNA do it’s magic with ThruLines and other hints.
3. Find as many MRCAs as you can – some are close low hanging fruit; many will be via ThruLines (which will find MRCAs in Private, but searchable, Trees); some you’ll find in Unlinked Trees (which ThruLines does not review).
4. Add what you find to the Notes of your Matches – see my blogpost here.
5. Review: It Is Iterativehere – the goal is to get info into the Notes of your Matches.
6. It is very important that you have information in the Notes of as many Matches over 20cM as possible.
SET UP DNAGEDcom CLIENT:
1. Subscribe to DNAGEDcom Client (DGC) (you can subscribe for one month to try it out). See links in this blogpost.
2. Click on the DCG Icon and Log in.
3. Set up your folder (you’ll access this folder regularly in the WTCB process)
IMPORTANT – Do not go beyond this point until you have completed the ANCESTRY TREE & MATCH NOTES Homework – we need the data in the Match Notes before we gather it in the next step!
4. Gather Matches and ICW from 20cM to 400cM (ignore Trees and Ethnicity for now – they are not needed for this WTCB process, and they can always be gathered later). This gathering process may take a day or more (depending on the number of Matches you have). I think the % Complete indicator is based on gathering all of your Match, so it may be misleading, and the gathering process will finish somewhat sooner.
5. This process will store several files on your computer:
a. m_yourname CSV file of your Matches with lots of information about each one, including your Notes, URLs to the Match and their Tree, Shared cMs, etc. This file is a gold mine by itself – I highly recommend you save a Working Copy of this file in Excel – it’s very useful.
b. icw_yourname CSV file – this is a large file used by the Clustering program
c. DNAGedcom Data Base File – where all the data is stored
6. The Clustering reports are run separately. Each run takes about a minute (not a typo), and produces 3 reports:
a. clm3d_yourname_[date,time,threshold string]_clusters CSV file – a list
b. clm3d_yourname_[date,time,threshold string] Excel file – includes a TAB you’ll use. [I make a copy of this file – appending the word “Working” – to use in WTCB.
c. clm3d_yourname_ date,time,threshold string] HTML doc – the colorful display.
SET UP YOUR MASTER WTCB SPREADSHEET
The last part of our homework assignment is to set up a Master WTCB spreadsheet template.
There are 3 features about this spreadsheet template:
1. It is a tool, to incrementally follow and interpret the data.
2. It is the culmination of many variations I have tried. It is fairly easy to set up, and it offers a lot of flexibility.
2. A standard spreadsheet will help me explain the various steps later in this post. Of course, you are free to use any format you want. In fact, I encourage feedback on improvements to this Master spreadsheet, or the whole WTCB process.
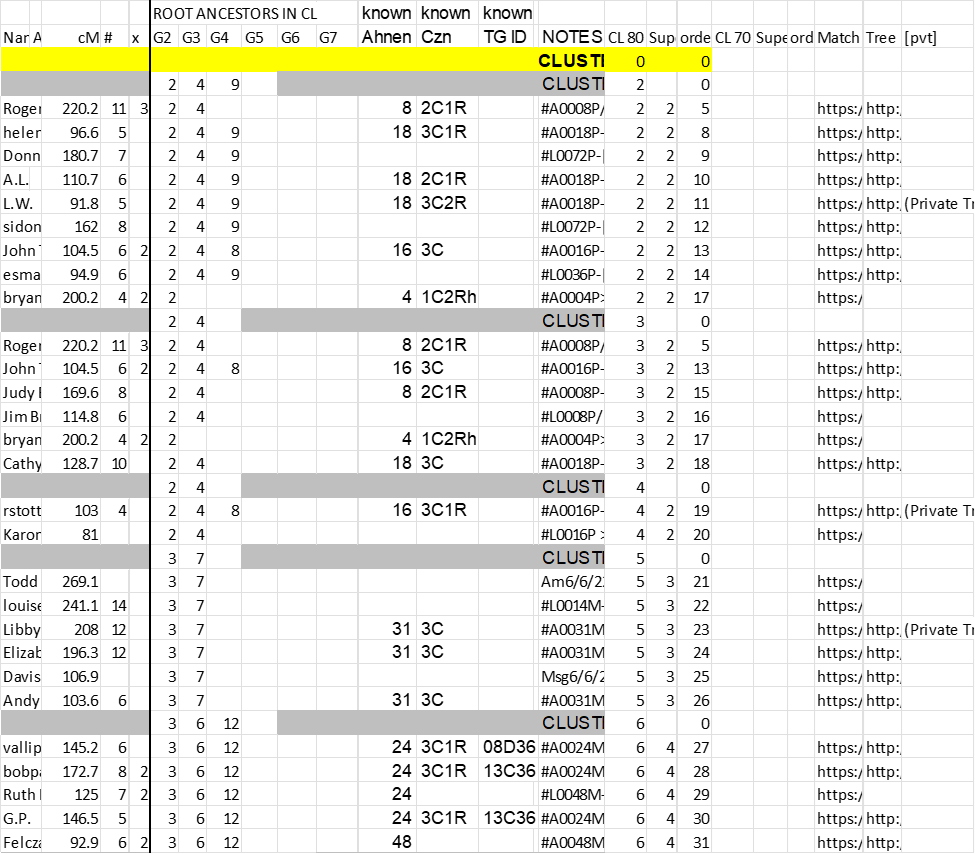
Here is a sample of my Master WTCB Spreadsheet with some data:
Notes:
1. This is from the initial CL 80cM Cluster run, and there are columns to the right for the 70cM Cluster results from the next run.
2. I have Notes for all of these close Matches – they were in the AncestryDNA Match Notes and then captured by the DGC Cluster program.
3. The data in the known columns was from the Notes
4. The data in the ROOT ANCESTORS columns was derived from the known data, and then imputed (copied) to the other Matches in the Cluster.
Teaser: these 5 Clusters have Root Ancestors from three of the four grandparents (4, 6 and 7) and CL 3 and CL 4 appear to be splitting to Great-grandparents 8 and 9. The Walk has started!
Here is a list of the 10 columns from the DGC Cluster run spreadsheet and where 9 of them go in the Master spreadsheet:
Note: the CL [B] and Super CL [C] columns copy to different columns in the Master spreadsheet, depending on the Cluster cM Threshold.
Here is a list of the 49 columns from the Master spreadsheet – with a brief description of each:
This covers the Homework section. Get ready to Walk The Clusters Back…
WTCB Master Spreadsheet overview:
Let’s divide the process into several stages for each Cluster run – details later:
1. Run a Cluster report at DGC; copy the data to the Master Spreadsheet; do some additional housekeeping chores to get the Master Spreadsheet Ready.
2. Merge duplicate Match rows (not with the initial run, but needed with subsequent runs, after the previous Matches are added to the spreadsheet)
3. Sort the Master Spreadsheet to show the Cluster Groups.
4. Type information into columns L, M and N from the Match Notes (when available).
5. Analyze each cluster, and fill in Root Ancestors (RAs) for all (in columns F-K as needed)
6. Save Master WTCB Spreadsheet for this run.
There are some other “details” I’ll explain as I expand on each of these stages below.
WTCB Master Spreadsheet details:
Here are the details for each stage:
1. Run a Cluster report at DGC; copy the data to the Master Spreadsheet; do some additional housekeeping chores to get the Master Spreadsheet Ready.
a. At DGC, click on the Autosomal TAB and select the Collins Leeds Method (CLM).
b. Select the Thresholds (start with 80cM and subtract 10cM for each of the next few runs); leave the upper limit at 400cM, and reduce that in later runs. I uncheck Paint Midline & Include Ancestors. Then click on the Run Grouping bar. It takes about a minute to produce the three files.
c. Open the file: clm3d_yourname_[date,time,threshold string] Excel file. I make a copy of this file – appending the word “Working” and save it in Excel format. Open the second TAB labeled Data.
d. Open the Master Spreadsheet and save it with the cM Threshold number (e.g. 80cM) append to the file name.
e For the next 4 steps – make sure you copy to the same blank row at the bottom of your Master Spreadsheet, so the columns line up properly with the Matches.
f. Copy columns B and C to the appropriate Master spreadsheet columns (this would be Q and R for the first 80cM run – it shifts with each subsequent run)
g Copy columns D, E and F to Master columns A, B and C
h. Copy columns G , H and I to Master columns AU, AV and AW
i. Copy column J to Master column P
j. In the appropriate order column [S for the first run], type a 1 for the first Match, then drag this down to the last Match to create a series. [I sometimes want to recreate the original Cluster order]
k. Use a new row to create a Header. In column O type: CLUSTER 80cM (or whatever the cM Threshold is for that run). Type 0 in the appropriate CL column and 0 in the appropriate order column. Yellow highlight this row.
l. Use another new row to create another Header. In column P type: CLUSTER RUN 80cM (or whatever the cM Threshold is for that run). Type 1 in the appropriate CL column and 0 in the order column. Highlight this row in light grey. Copy this row so there is one for each Cluster. Drag the 1 in the CL column down to fill in the series – this provides a numbered header for each Cluster.
2. Merge duplicate Match rows. Note: this step is not used for the first (80cM) Cluster run – there is only one set of Matches, so merging is not required. In subsequent runs, the prior Matches are in the Master Spreadsheet (all those above 80cM, in the second run), and all the Matches from the new Cluster run will be added to the Master Spreadsheet (all those above 70cM). This means the prior Matches (above 80cM) will be duplicated, but in the new run they will only have Cluster data from the new (70cM) run in the CL and CL Super columns. This step will merge the duplicated Matches into one row with prior and new CL and Super CL data (and the order numbers); and delete the other row. Here we go…
a. Tip – sort the Spreadsheet by C [cM]. This puts all of the new, smaller cM, Matches at the top.
b. Highlight the rest of the Match rows and sort by Name and cM and CL [for the current run]. This puts all the duplicate Matches together, with the ones from the new run (with a value in the CL column) on top.
c. a view of the spreadsheet at this point – showing the duplicate Matches on the left, and the CL 70, Super, and Order data that needs to be copied down one row. Notice also that the Matches below 80cM are still in this sort. This is OK, but be careful dragging the data down. By using the Tip above, these can be sorted out, which makes this merging step a little easier.
c. Copy (or drag) the 3 cells (CL, CL Super and order number data) down one row and paste it into the same columns (to add it to the duplicate Match who already has some data from previous runs). Then delete the Match which you just copied from. [Tip: an alternative to deleting the rows one-by-one, is to type an x in the order cell of the top Match and later sort the spreadsheet by that column and deleting all the rows with an x.]
d. Continue to the bottom of the Matches in this Cluster run – a boring task .
3. Sort the Master Spreadsheet to show the Cluster Groups.
a. Highlight all the rows of the spreadsheet (under the main header) and sort on CL and order – columns Q and S in the first run – it shifts to the right with subsequent Cluster runs.
b. You should now have a nice looking WTCB Master Spreadsheet with a group of Matches under each grey CLUSTER RUN Header – see the sample above. You’re ready to start working with the data.
4. Type information into columns L, M and N from the Match Notes (when available).
a. Work down the spreadsheet, looking at the information in the Notes. For Matches with known MRCAs and/or TGs, type in the MRCA Ahnen in column L; cousinship in Column M and TG ID in column N
b. This is populating the Master Spreadsheet with data from the Notes – this is why the Notes Homework (before running the DGC gathering program) is so important.
5. Analyze each cluster, and fill in Root Ancestors (RAs) for all (in columns F-K as needed)
a. This is where the Ahnen system shines (using numbers instead of typing out the Ancestor names); and descendants are always half the father’s Ahnentafel, so we can easily work from the MRCA Ahnen back down to a parent)
b. Fill in the Root Ancestor Ahnentafel numbers where an MRCA is known. Note: The “Root Ancestor(s)” are the closest ones to you – NOT including the MRCA Couple. The basic RA is a parent – using Ahnentafels, this would be a 2 or 3 (father or mother). The next RA (at Generation 3) must be a grandparent – a 4, 5, 6, or 7 – 4 and 5 are the parents of 2; 6 and 7 are the parents of 3. The line of descent (and most probably the shared DNA segment) comes from the MRCA to you along this path.
c. Use judgment to determine the consensus RAs that would apply to all the Matches with known MRCAs. Note: if there is a Match who is clearly inconsistent with the rest, ignore or move that Match row (to a different Cluster or a “time out” area at the bottom of the spreadsheet).
d. Copy these consensus RAs to all the Matches in the Cluster. The concept here is that each Cluster is formed around an Ancestor, and that all the Matches would have these same RAs. The stronger the Cluster consensus is, the stronger the case for the same RAs. There may be some Match anomalies, but by Walking The Clusters Back, I’ve found that the same RAs are almost always consistent.
e. A very few Matches in a Cluster may be at odds with the consensus. This may be due to an incorrect MRCA (it happens to me and to ThruLines). It may also be due to the Matches having multiple MRCAs with me, and/or multiple segments. Check the DGC HTML file to see if there are grey cells that link the Match to another Cluster(s). When a Match appears to me to be “better” in a linked Cluster, I move their row to that other Cluster in the spreadsheet and change the CL number to match (I leave the order number in case I want relook at the original Cluster list.)
6. Save Master WTCB Spreadsheet for this run. For each Cluster run, I save the Master Spreadsheet with a new descriptor added to the file name – like 70cM.
This is a repetitive process – go back to #1, and run a new Cluster report – keep going….
Objectives of WTCB
Identify root ancestors for Clusters, and, by inference for all the Matches in them. This provides a pointer when investigating any Clustered Match. It gives direction (names, dates, places) when building a Match’s Tree back; to finding an MRCA with any Match; to researching Brick Walls.
Notes/Observations:
1. Start with a high cM Threshold, say 80cM or 90cM. I have found that reducing the cM threshold by 10cM about doubles the number of Matches in the next run – to a point. The shift from a 50cM threshold to a 40cM threshold added much more than double – so I back tracked and started using a 5cM reduction to get a 45cM run. Similarly when I got to the 30cM range, I then reduced by 4cM, then 3cM, then 2cM (for a final run with a 20cM threshold.
2. A very few Matches turned out to be anomalies – they did not “fit” in the Cluster they were assigned by DGC, based on the MRCA we had. If they had a grey cell link to another Cluster with a good fit, I moved them to that Cluster. If they didn’t appear to fit any grey cell Cluster, I moved them to a “time out” section at the bottom of the spreadsheet, with an X in the CL column. These very few Matches probably had an issue with the MRCA, that I needed to investigate. They were in “time out” so they didn’t “taint” the Cluster analysis – I could look at them later. The Cluster is talking to you – try to understand what the message is.
3. The Clusters *tend* toward a single MRCA, as the upper cM Threshold is decreased.
4. Do not be afraid to move a Match from one Cluster to another. Review alternate “grey” cells in the the HTML Cluster diagram. If a Match has, say, 5 squares in a Cluster, and several grey links to another Cluster (which other Cluster is a much better “fit”), I would not hesitate to move that Match. Usually this will resolve itself in subsequent Cluster runs.
5. Excel Macro – for the task of copying 3 cells from a Match from a new Cluster run and pasting it into that Match from the previous Cluster run, and then deleting the first Match. Here are the steps:
a. Go to File > Options > Customize the Ribbon > add “Developer” to the Main Tabs
b. In the spreadsheet, insure “Use Relative References” is ON [highlighted]
c. Position cursor on the CL cell of the top Match;
c. Click Record Macro [fill in the popup – the only critical thing is a letter for the Macro]
a. Highlight the three numbers [in CL, Super CL, and order columns]
b. Control-C to copy that data
c. Click on next cell to the right
d. Type: x [this will let you easily delete all these rows later)
e. Click on the CL cell in the next row (this should be the same Match from previous run)
f. Control-V to paste the data into three cells
g. Click on the CL cell in the next row [to preposition the curser for the next Match]
h. Click Stop Macro.
i. Save Spreadsheet with Macro Enabled
j. Good luck – it took me several tries to get it right. Practice on a spreadsheet copy.
6. Special Note: Some close Matches have multiple MRCAs with me. They may well be related though multiple Clusters. I make duplicate copy of that Match and add it to other Clusters per the gray cells. Once moved I adjust the CL and super columns per their new Clusters. Use judgment, but I think after about two cycles with the multiple copies of close Matches (closer than the Cluster Root Ancestors indicate), they can be eliminated from future Clusters. They have done their job of solidifying the root ancestors in other Matches.
7. I also think the maximum/upper cM Threshold needs to be reduced as the Clusters evolve. We don’t need the higher cM/closer Matches – they have already passed on their Root Ancestors to the Clusters in the Master Spreadsheet. They should be dropped from the Spreadsheet. I put an X in the CL column to remind me they are no longer needed.
8. Some Matches wind up in singleton Clusters – this is silly, a Match doesn’t form a Cluster with itself. And most of the time these Matches show a grey link to another Cluster. I move (Ctrl-X; Ctrl-V) the Match row to the other Cluster and change the CL cell to match that Cluster (so they will sort with that Cluster in the future). I sometimes also move Matches out of very small Clusters when that seems appropriate. Most of the time subsequent Cluster runs resolve these issues.
9, If a Cluster goes through several iterations without any indication of a more distant RAs, there may be an MPE or brick wall involved –a strong potential clue from the data.
Manual WTCB Process
If all of this is overwhelming, you can try a few iterations using manual Clustering. Start with the Leeds Method that results in 4 Clusters, one for each grandparent. So in these 4 Clusters you already have two Root Ancestors for each [2-4, 2-5, 3-6 and 3-7, using Ahnentafels]. Find your Matches who are in the 80 to 90cM range and manually Cluster them. Start by seeing which ones are Shared Matches with the ones in the 4 Clusters – that automatically gives each one the same two Root Ancestors as the Cluster they share {actually the Matches they share). Now, from the information you know about these new Matches, do any have an MRCA at the 2xG grandparent level – this would give you the next Root Ancestor – for that Match, and that Matches shared Matches. Keep dropping the cM Threshold, checking Shared Matches for Cluster affinity, and using the Matches with MRCAs to tease out the next Root Ancestor for each Cluster. This is workable with a small number of Matches, but when you have 500 or 1,000 Matches to work with, you will yearn for automated Clustering…
Tracking RAs
Some results so far:
At 60cM run: 11 Clusters: with generation 5 (G5) RAs:
Paternal RAs: 8, 8, 9, 9, 10, and 11; Maternal RAs: 12,, 12, 12, 13 and 14/15
-The last Cluster, 14/15, is my maternal grandmother whose immigrant parents had two brothers married two sisters resulting in few Matches, those are hard to separate until I can get more distant Matches.
-I’m happy with this spread – it includes Clusters for all 8 of my Great grandparents. The WTCB is working…
– The 70cM run had 47 Matches in 8 Clusters; 60cM run had 75 Matches in 11 Clusters. Roughly double the number of Matches (and analytical review work) in 3 additional Clusters. My experience is that the doubling of Matches with each 10cM decrease in Threshold continues…
At 50cM run: 128 Matches in 24 Clusters (net, after moving several singleton Matches to Clusters they shared with other Matches).
-These are broken apart quite nicely, I think. And the uneven nature of the splits (not cleanly by generation like the 4 grandparents often do); illustrates the folly of trying to find a sweet spot in the Thresholds to result in one specific generation (like we get with grandparents). I should have expected this – beyond the grandparent level the Shared cM Project shows growing overlap of cM values for a growing range of cousinships. So, this WTCB process just lives with that, and tracks the Matches as the Clusters grow in size and split apart – Walking The Clusters Back!.
Abbreviations
Ahnen – abbreviation for Ahnentafel number – a system of numbers to represent our Ancestors [e.g. 2 for father; 13 for mother’s father’s mother] – see also this blogpost.
CL – Cluster, or Cluster Run [usually combined with a number representing the lower cM Threshold]
Czn – Cousinship – how we are related to a Match. Second Cousin is abbreviated 2C; 5th cousin once removed: 5C1R.
DGC – DNAGEDcom Client – an automated Clustering program – runs from your computer.
MRCA – Most Recent Common Ancestor – this is usually a couple that you and a Match have in common. Usually represented by the Ahnentafel of the husband, but we really don’t know which parent (husband or wife in the MRCA couple) the shared DNA came from.
RA – Root Ancestor – the Ancestors you have leading up to the MRCA. This should always include your parent and grandparent (each is a RA). During the WTCB process, the number of RAs will generally increase (adding generations) and increasing the ancestral “focus” for each Cluster.
TG ID – Triangulate Group Identification Code – see this blogpost.
WTCB – Walking The Clusters Back – the process discussed in the post which helps determine the MRCA of most Clusters – sort of a Leeds method on steroids.
Final Thoughts
This WTCB process uses the power of Clustering to link large groups of Matches to specific areas of your Ancestry. As the process develops, the Clusters become more and more precise on the path back to an MRCA. There are only two options for each Cluster going back another generation – going back on the paternal side or the maternal side. Larger Clusters with more distant Matches, tease this information out of the data. The Homework is essential – recording what you know in the Notes; and the work is sometimes tedious; but the end result is very powerful.
I’m confident this process will tell us some Root Ancestors for all of our Matches down to 20cM. Just think what we could do with those clues…
Feedback on this process and suggestions for improvement are welcome.
[19N] Segment-ology: Walking The Clusters Back by Jim Bartlett 20220822
Genetic Genealogy is a very iterative process – particularly at AncestryDNA. The more you find out, the more the AncestryDNA Tools feed back new clues to you.
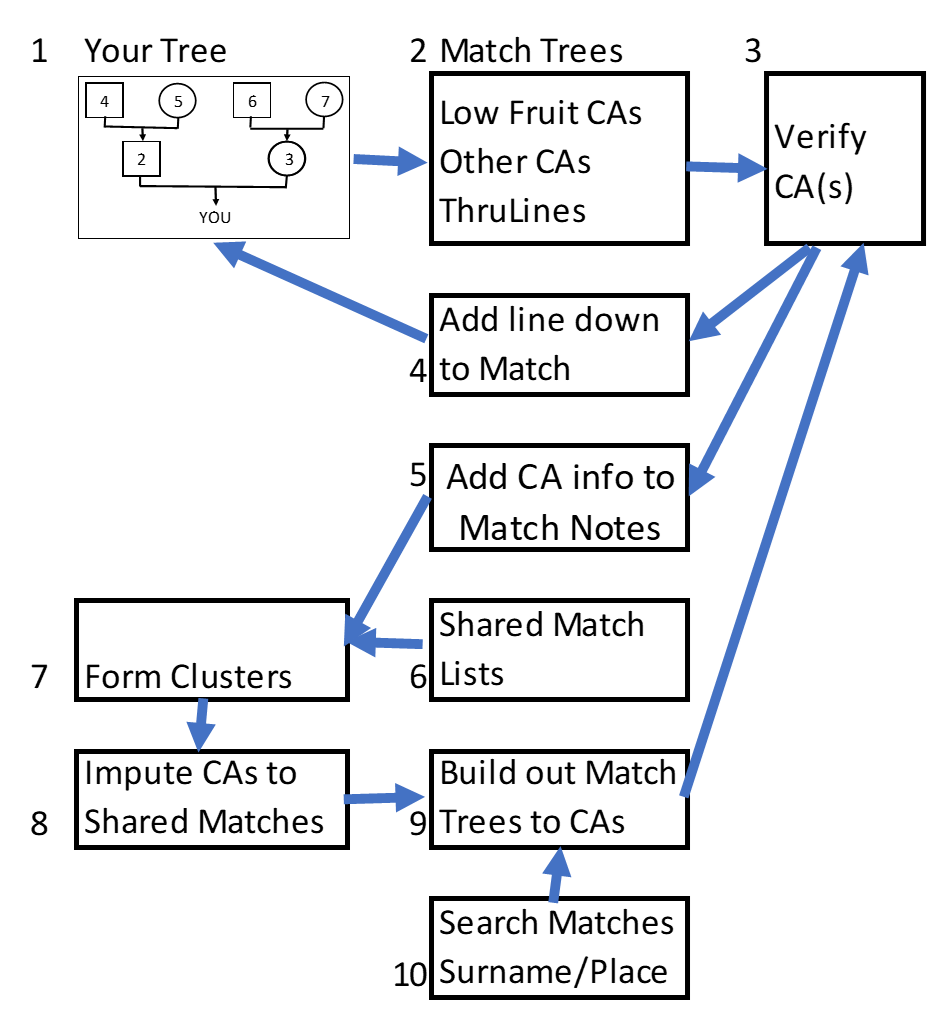
Here is an overview:
Genetic Genealogy Process at Ancestry DNA
Let’s take it step-by-step and see how it snowballs…
1. First build your Tree and link it to your DNA results. This is very important because AncestryDNA keys off of this information, and your DNA Matches, to provide you with strong clues. Even if you don’t know much about your ancestry, list yourself and the Ancestors you know with their birth/marriage/death dates/places. Even one or two generations can often link you into AncestryDNA’s giant Tree. Focus on adding the Ancestors you know. Later you can add pictures, records, children, etc.
2. Work your way down your DNA Match list (your closest Matches are at the top of the list) and try to determine how you are related to them. Find the “low hanging fruit” first. Continue to work on other Close Matches who have Trees. Check out any/all ThruLines. You are looking for Common Ancestors (CAs) with your Matches.
3. Verify! All the CAs you find should be verified by you – both the individual Ancestors as well as the line of descent down to the Match.
4. When you are satisfied that the Match really descends from your CA, add the line of descent and the Match (as a living person) into your Tree. I find that this step tends to generate more ThruLInes. Note that ThruLines finds lines and Matches in Private Trees – something we cannot do.
5. Add the CA information to the Match’s Notes. This keeps track of it for you, AND, since the Notes are visible in a Shared Match List, it helps build consensus for CAs in Clusters. The information you put into the Notes is very valuable. More on Notes in this blogpost here.
6. For each Match you are working on, always look at the Shared Match List. The Shared Match Notes will tell you when there is a consensus; they add confidence as you add more and more notes pointing to the same CA.
7. Also use the Shared Match Lists to build Clusters – either automated Clusters including many of your Matches or a Manual Cluster focused on a few Matches for a particular objective. See my DIY Clustering blogpost here.
8. Clusters have been shown to group on an Ancestor. If you see this congruence in the Notes, you can input a *clue* in the Notes of other Matches in the Cluster. (The *clue* is not rock solid evidence). This includes Matches with No or Private Trees. The Clusters and Notes often provide an Ancestor “pointer” for these other Matches – which is sometimes the only information you have about them.
9. For Matches with *clues* in their Notes, see if you can build out their Tree to the CA. Building out Trees is one of best genealogy Tools, and it’s somewhat more efficient when you have a target CA (with known surname and timeframe and location). At this point, cycle back to Step 3 and verify the line and Step 4 add it to your Tree and Step 5 add the information in the Match’s Notes.
10. Additionally, you can search your Match list for Surnames and Places. See my blog post here. This search returns a list of your Matches, who share DNA with you, and who have a large enough Tree which includes the Surname in their Ancestry – that’s a pretty efficient method of finding CAs. You might have to build out the Match Tree, and you’ll need to do Steps 3, 4 and 5 again.
This whole process adds information to your Tree and to the Match Notes. These in turn lead to more ThruLines CAs, which continues this iterative process.
[22BI] Segment-ology: It is Iterative TIDBIT by Jim Bartlett 20220731